Riverpod State management in Flutter

In this blog we’ll take a look at the Rivepod approach in Flutter. The Riverpod is far easier to learn and has much less boilerplate code as compared to BLoC pattern.
In this post, i’ll take demo of todo app and use the riverpod pattern on it. In this demo we can add todo task and later device them in three section like i)All todo list, ii)Completed todo list iii) In-Completed todo list.
You can get source code from Github.
You can check my previous post on Flutter with Provider State management and State Management in Flutter with GetX previously.
Providers
Now that we have installed Riverpod, let’s talk about “providers”.
Providers are the most important part of a Riverpod application. A provider is an object that encapsulates a piece of state and allows listening to that state.
Why use providers?
By wrapping a piece of state in a provider, this:
- Allows easily accessing that state in multiple locations. Providers are a complete replacement for patterns like Singletons, Service Locators, Dependency Injection or InheritedWidgets.
- Simplifies combining this state with others. Ever struggled to merge multiple objects into one? This scenario is built directly inside providers, with a simple syntax.
- Enables performance optimizations. Whether for filtering widget rebuilds or for caching expensive state computations; providers ensure that only what is impacted by a state change is recomputed.
- Increases the testability of your application. With providers, you do not need complex
setUp/tearDownsteps. Furthermore, any provider can be overridden to behave differently during test, which allows easily testing a very specific behavior. - Easily integrate with advanced features, such as logging or pull-to-refresh.
Creating a provider in Riverpod
Providers come in many variants, but they all work the same way.
The most common usage is to declare them as global constant like so:
final myProvider = Provider((ref) {
  return MyValue();
});
Benefits of Provider in Riverpod
The provider pattern in Flutter will look for the latest value provided. The diagram below will help you better understand.
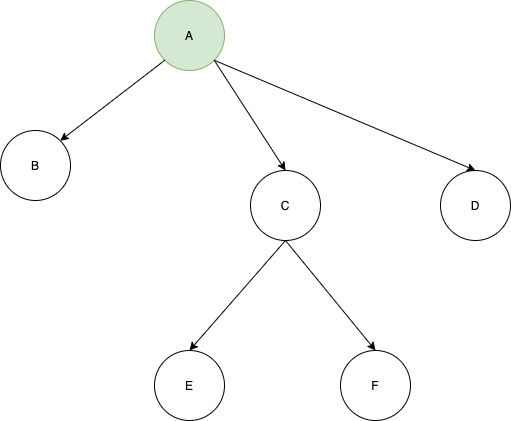
In this diagram the GREEN object A will be available to the rest of the elements below it, that is B, C, D, E, and F.
Reading a provider
Now we will see how to consume(access) a provider.
Obtaining a “ref” object
First and foremost, before reading a provider, we need to obtain a “ref” object.
This object is what allows us to interact with providers, be it from a widget or another provider.
Obtaining a “ref” from a provider
All providers receive a “ref” as parameter:
final provider = Provider((ref) {
  // use ref to obtain other providers
  final repository = ref.watch(repositoryProvider);

  return SomeValue(repository);
})
Obtaining a “ref” from a widget
Widgets naturally do not have a ref parameter. But Riverpod offers multiple solutions to obtain one from widgets.
Extending ConsumerWidget instead of StatelessWidget
The most common solution will be to replace StatelessWidget by ConsumerWidget when creating a widget.
ConsumerWidget is basically identical to StatelessWidget, with the only difference being that it has an extra parameter on its build method: the “ref” object.
A typical ConsumerWidget would look like:
class HomeView extends ConsumerWidget {
  const HomeView({Key? key}): super(key: key);

  @override
  Widget build(BuildContext context, WidgetRef ref) {
    // use ref to listen to a provider
    final counter = ref.watch(counterProvider);
    return Text('$counter');
  }
}
Getting Started
Create a new Flutter project and name it whatever you want.
Now add the flutter_riverpod dependency for the provider pattern in the pubspec.yaml file.
dependencies:
  flutter:
    sdk: flutter
  flutter_riverpod: latest_version
I have considered following architecture

Models
Below is the code to create Todo Model class
class Todo{
  String title;
  bool completed;

  Todo({ this.completed = false, @required this.title});

  void toggleCompleted() {
    completed = !completed;
  }

}
Provider
I have created todo_notifier.dart file in which i have added business logic for todo app
final todoNotifier = ChangeNotifierProvider<TodoNotifier>((ref) => TodoNotifier()
);

class TodoNotifier with ChangeNotifier{
  List<Todo> _todos = [
    Todo(title: 'Todo One'),
    Todo(title: 'Todo Two'),
    Todo(title: 'Todo Three'),
    Todo(title: 'Todo four'),
  ];

  UnmodifiableListView<Todo> get allTodos => UnmodifiableListView(_todos);

  UnmodifiableListView<Todo> get inCompleteTodos => UnmodifiableListView(_todos.where((Todo todo) {
    /// Return In-Completed todos items
    return todo.completed == false;
  }));

  UnmodifiableListView<Todo> get completeTodos => UnmodifiableListView(_todos.where((Todo todo) {
    /// Return Completed todos items
    return todo.completed;
  }));

  void addTodo(Todo todo) {
    /// Add new task and update list
    _todos.add(todo);
    notifyListeners();
  }

  void deleteTodo(Todo todo) {
    /// Delete a task and update list
    _todos.remove(todo);
    notifyListeners();
  }

  void toggleTodo(Todo todo) {
    /// Make a task complete or pending
    final todoIndex = _todos.indexOf(todo);

    _todos[todoIndex].toggleCompleted();
    notifyListeners();
  }

}
CAUTION
For providers to work, you must add ProviderScope at the root of your Flutter applications:
void main() {
  runApp(ProviderScope(child: MyApp()));
}
Pages
Now we will make add ProviderScope at root of code in main.dart file for accessing all provider through out the app
void main() => runApp(ProviderScope(child: MyApp()));

class MyApp extends StatelessWidget {
  @override
  Widget build(BuildContext context) {
    return MaterialApp(
      title: 'Flutter Todo',
      debugShowCheckedModeBanner: false,
      theme:
          ThemeData(primarySwatch: Colors.blue, brightness: Brightness.light),
      home: MyHomePage(
        title: 'Todo App',
      ),
    );
  }
}

class MyHomePage extends StatefulWidget {
  MyHomePage({Key key, this.title}) : super(key: key);

  final String title;

  @override
  _MyHomePageState createState() => _MyHomePageState();
}

class _MyHomePageState extends State<MyHomePage> {
  @override
  Widget build(BuildContext context) {
    return DefaultTabController(
      length: 3,
      child: Scaffold(
          appBar: AppBar(
            actions: <Widget>[
              IconButton(
                onPressed: () {
                  Navigator.push(context,
                      MaterialPageRoute(builder: (context) => AddTodoPage()));
                },
                icon: Icon(Icons.add),
              ),
            ],
            bottom: TabBar(
              tabs: [
                Tab(text: 'All'),
                Tab(text: 'Complete'),
                Tab(text: 'In Complete'),
              ],
            ),
            title: Text(widget.title),
          ),
          body: TabBarView(
            children: [
              AllTodos(),
              CompleteTodos(),
              InCompleteTodos(),
            ],
          )),
    );
  }
}
The file add_todo_page.dart is created for adding new task in todo list. In below example we access notifier with Provider.of<TodoNotifier> passing argument current context and listen: false , listen false as a result we do not need to update current button for adding task.
class AddTodoPage extends StatefulWidget {
  @override
  _AddTodoPageState createState() => _AddTodoPageState();
}

class _AddTodoPageState extends State<AddTodoPage> {
  final todoTextController = TextEditingController();
  bool completeStatus = false;

  @override
  void dispose() {
    todoTextController.dispose();
    super.dispose();
  }

  @override
  Widget build(BuildContext context) {
    return Scaffold(
      appBar: AppBar(title: Text("Add new Todo"),),
      body: ListView(
        children: <Widget>[
          Padding(
            padding: EdgeInsets.all(16),
            child: Column(
              children: <Widget>[
                TextField(
                  controller: todoTextController,
                  decoration: InputDecoration(border: OutlineInputBorder(), hintText: 'Todo title',),
                ),
                CheckboxListTile(
                  value: completeStatus,
                  title: Text('Complete?'),
                  onChanged: (bool checked) {
                    setState(() {
                      completeStatus = checked;
                    });
                  },
                ),
                Consumer(builder: (_, WidgetRef ref, __) {
                  return ElevatedButton(
                    onPressed: () => onAdd(ref),
                    child: Text("Add"),
                  );
                }),
              ],
            ),
          )
        ],
      ),
    );
  }

  void onAdd(WidgetRef ref) {
    final String todoTitle = todoTextController.text;
    final bool complete = completeStatus;

    if (todoTitle.isNotEmpty) {
      final Todo todo = Todo(title: todoTitle, completed: complete);
      ref.watch(todoNotifier).addTodo(todo);
    }
    Navigator.pop(context);
  }
}
Now we display all task in list for that i have created all_todos_page.dart in which all task has been listed weather it is compete or In-complete.
class AllTodos extends ConsumerWidget {
  @override
  Widget build(BuildContext context, WidgetRef ref) {
    final allTodos = ref.watch(todoNotifier).allTodos;
    return Container(
      child: TodoListView(todos: allTodos,),
    );
  }
}
Accordingly the completed task list in complite_todos_page.dart
class CompleteTodos extends ConsumerWidget {
  @override
  Widget build(BuildContext context, WidgetRef ref) {
    final List<Todo> completeTodos = ref.watch(todoNotifier).completeTodos;

    return Container(
        child: TodoListView(
      todos: completeTodos,
    ));
  }
}
Moreover the In-completed task list in incompelet_todos_page.dart
class InCompleteTodos extends ConsumerWidget {
  @override
  Widget build(BuildContext context, WidgetRef ref) {
    final List<Todo> inCompleteTodos = ref.watch(todoNotifier).inCompleteTodos;

    return Container(
        child: TodoListView(
      todos: inCompleteTodos,
    ));
  }
}
Now the common TodoListView used in all three list in todo_list_view.dart
class TodoListView extends StatelessWidget {
  final List<Todo> todos;

  const TodoListView({Key key, this.todos}) : super(key: key);

  @override
  Widget build(BuildContext context) {
    return Container(
      child: ListView.builder(
        itemBuilder: (BuildContext context, int index) => Consumer(
            builder: (_, WidgetRef ref, __) {
          final todoProvider = ref.watch(todoNotifier);

          return ListTile(
            title: Text(todos[index].title),
            leading: Checkbox(
                value: todos[index].completed,
                onChanged: (bool checked) {
                  todoProvider.toggleTodo(todos[index]);
                }),
            trailing: IconButton(
                icon: Icon(Icons.delete, color: Colors.red,),
                onPressed: () {
                  todoProvider.deleteTodo(todos[index]);
                }),
          );
        }),
        itemCount: todos.length,
      ),
    );
  }
}
In above code you can notice that we access notifier with Consumer to toggle and delete item from the list and in this way we can manage state in app with help of Riverpod.
Afterwards when you run app you can see once added a task can be able to access in all widgets and can also be manipulated from any widget.

Hope you like the concept of riverpod in flutter. As compared to other other state management approach this is quire easy to implement.