Flutter custom platform-specific code Platform channel

In the ever-evolving world of mobile app development, cross-platform frameworks like Flutter have gained immense popularity for their ease of use and flexibility. However, there are times when you need to tap into the power of native code to access device-specific features or improve performance. In this article, we’ll explore the fascinating realm of calling native code in Flutter with help of platform channel and how you can seamlessly integrate it into your Flutter projects.
Read other articles related to Flutter here.
Introduction: Bridging the Gap
Native code refers to the programming languages specific to a particular platform, such as Java or Kotlin for Android and Swift or Objective-C for iOS. Flutter, on the other hand, uses Dart as its primary language. To create a bridge between Flutter and native code, you need to leverage a powerful tool called Platform Channels.
What Are Platform Channels?
Platform Channels act as a communication bridge between your Flutter code and native code. They enable you to send messages and data between the two worlds, making it possible to call native functions from Flutter and vice versa. Here’s how to get started:
- Create a Platform Channel: The first step is to define a platform channel. This channel acts as a named pipe for communication between Flutter and native code.
- Implement Platform-Specific Code: Write the platform-specific code in Java or Kotlin for Android, Swift or Objective-C for iOS. This code will handle the communication with your Flutter app.
- Invoke Native Code: In your Flutter code, use the platform channel to invoke native functions or methods.
Setting Up Your Flutter Project
Before you can call native code in Flutter, you need to set up your project properly. Let’s go through the steps:
Prerequisites
Before we dive in, make sure you have the following prerequisites in place:
- A working knowledge of Dart and Flutter
- The Flutter SDK installed on your system
- Android Studio or Xcode for platform-specific development
- Basic understanding of the native language for the platform you’re targeting (Java/Kotlin for Android, Swift/Objective-C for iOS, JS for Web)
Creating a Flutter Project
- Initialize a New Flutter Project: Use the following command to create a new Flutter project:
flutter create flutter-platform-channel- Replace
flutter-platform-channelwith your desired project name. - Open the Project in Your IDE: Use Android Studio for Android development and Xcode for iOS. Set up your development environment accordingly.
Writing Native Code
Next, let’s explore how to write native code for both Android and iOS platforms.
In Following example we will try to get Operating system name from native site to flutter project. In Order to achieve that we need to create Channel name “devBlog.platform.com” in order to create communication between Flutter and Native platform ( Channel name depends on you).
Then we will create a method name by which native will identify the request given by flutter, in our example it will be “getOSName”.
Github Link of following example is here.
Android
For Android, we’ll be using Kotlin. Let’s look at a basic example of how to create a native method that can be called from Flutter. Replace/Modify following code in MainActivity.kt file inside android project.
package com.devblog.link.platform_channel

import io.flutter.embedding.android.FlutterFragmentActivity
import io.flutter.plugin.common.MethodCall;
import io.flutter.plugin.common.MethodChannel;
import io.flutter.embedding.engine.FlutterEngine;
import io.flutter.embedding.engine.plugins.FlutterPlugin;
import android.os.Build;
import androidx.annotation.NonNull

class MainActivity: FlutterFragmentActivity() {
    private val CHANNEL = "devBlog.platform.com"
    private lateinit var result:MethodChannel.Result

    override fun configureFlutterEngine(@NonNull flutterEngine: FlutterEngine) {
        super.configureFlutterEngine(flutterEngine)

        MethodChannel(flutterEngine!!.dartExecutor.binaryMessenger, CHANNEL).setMethodCallHandler { call, result ->
            if (call.method == "getOSName") {
                val name = getOsName()
                result.success(name)
            }
        }
    }
    private fun getOsName(): String {
        return "Android " + Build.VERSION.RELEASE
    }
}
iOS
For iOS, we’ll use Swift . Here’s a similar example for creating a native method. Replace/Modify following code inside AppDelegate.swift inside iOS project:
import UIKit
import Flutter

@UIApplicationMain
@objc class AppDelegate: FlutterAppDelegate {
  override func application(
    _ application: UIApplication,
    didFinishLaunchingWithOptions launchOptions: [UIApplication.LaunchOptionsKey: Any]?
  ) -> Bool {
    GeneratedPluginRegistrant.register(with: self)

      if let controller = window?.rootViewController as? FlutterViewController {
                  let channel = FlutterMethodChannel(
                      name: "devBlog.platform.com",
                      binaryMessenger: controller.binaryMessenger
                  )
                  channel.setMethodCallHandler({ (call: FlutterMethodCall, result: FlutterResult) in
                      if call.method == "getOSName" {
                          result("iOS " + UIDevice.current.systemVersion)
                      } else {
                          result(FlutterMethodNotImplemented)
                      }
                  })
              }

    return super.application(application, didFinishLaunchingWithOptions: launchOptions)
  }
}
Web
In flutter web folder does not capability to handle method channel request. So Dart gives facility to write javascript code with help of JavaScript interoperability.
But when ever the dart:html is imported in project the mobile apps stops working the reason for this is that dart:html is a library that is intended for web applications, and it provides access to browser-specific functionality. Flutter, on the other hand, is a framework for building cross-platform mobile and web applications, but it uses a different set of libraries and APIs than those provided by dart:html.
To achieve this we need either conditional-import or we can make separate plugin for same. To create web base plugin template we’ll use this command:
flutter create --template=plugin --platforms=web web_os_checkerDepending on your flutter SDK, if you are using latest SDK the above command will create plugin template for web platform will be something like this.
We created this plugin in root directory of our project.
web_os_checker.dart will have code something like this:
import 'web_os_checker_platform_interface.dart';

class WebOsChecker {
  Future<String?> getPlatformVersion() {
    return WebOsCheckerPlatform.instance.getPlatformVersion();
  }
}
web_os_checker_web.dart will have code something like this:
import 'dart:html' as html show window;
import 'package:flutter_web_plugins/flutter_web_plugins.dart';
import 'web_os_checker_platform_interface.dart';

/// A web implementation of the WebOsCheckerPlatform of the WebOsChecker plugin.
class WebOsCheckerWeb extends WebOsCheckerPlatform {
  /// Constructs a WebOsCheckerWeb
  WebOsCheckerWeb();

  static void registerWith(Registrar registrar) {
    WebOsCheckerPlatform.instance = WebOsCheckerWeb();
  }

  /// Returns a [String] containing the version of the platform.
  @override
  Future<String?> getPlatformVersion() async {
    final version = html.window.navigator.userAgent;
    return version;
  }
}
The above code will return user agent for web platform having detail of web host OS.
Flutter
Lastly let’s create flutter side code. In Flutter there will be 2 Dart files for our example one is main.dart for UI and other platformHelper.dart to call Platform code
Replace/Modify following code in main.dart file
import 'package:flutter/material.dart';
import 'package:platform_channel/PlatformHelper.dart';

void main() {
  runApp(const MyApp());
}

class MyApp extends StatelessWidget {
  const MyApp({super.key});

  @override
  Widget build(BuildContext context) {
    return MaterialApp(
      title: 'Flutter Demo',
      debugShowCheckedModeBanner: false,
      theme: ThemeData(
        colorScheme: ColorScheme.fromSeed(seedColor: Colors.deepPurple),
        useMaterial3: true,
      ),
      home: const MyHomePage(title: 'Flutter Demo'),
    );
  }
}

class MyHomePage extends StatefulWidget {
  const MyHomePage({super.key, required this.title});

  final String title;

  @override
  State<MyHomePage> createState() => _MyHomePageState();
}

class _MyHomePageState extends State<MyHomePage> {

  String osName = '';

  @override
  Widget build(BuildContext context) {
    return Scaffold(
      appBar: AppBar(
        backgroundColor: Theme.of(context).colorScheme.inversePrimary,
        title: Text(widget.title),
      ),
      body: Center(
        child: Column(

          mainAxisAlignment: MainAxisAlignment.center,
          children: <Widget>[
            ElevatedButton(
              child: const Text('Get os Name'),
              onPressed: () {
                PlatformHelper.getOSName().then((value) {
                  setState(() {
                    osName = value;
                  });
                });
              },
            ),
            const SizedBox(height: 100,),
            Text(
              osName,
              style: Theme.of(context).textTheme.headlineMedium,
            ),
          ],
        ),
      ),
    );
  }
}
Add following patformHelper.dart file in project
import 'package:flutter/foundation.dart';
import 'package:flutter/services.dart';
import 'package:web_os_checker/web_os_checker.dart';

class PlatformHelper {
  static const MethodChannel _channel = MethodChannel('devBlog.platform.com');

  static Future<String> getOSName() async {
    String osName;
    try {
      if(kIsWeb){ /// Calling web native code with help of plugin
        osName = await WebOsChecker().getPlatformVersion()??"";
      }
      else {
        osName = await _channel.invokeMethod('getOSName');
      }
    } catch (e) {
      osName = 'Unsupported OS';
    }
    return osName;
  }
}
Inside your package’s pubspec.yaml, you can specify the platforms that your plugin supports, including the web platform:
dependencies:
  flutter:
    sdk: flutter

  web_os_checker:
    path: web_os_checker #Plugin is in root folder of project
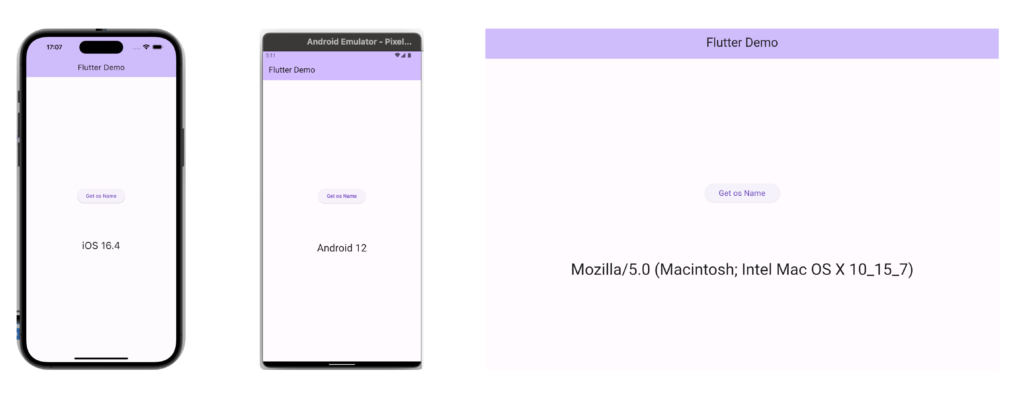
This is it. After completing above flutter code and running the app it will look something like this in all platform.

Conclusion
Calling native code in Flutter opens up a world of possibilities for enhancing your app’s functionality and performance. By using Platform Channels, you can seamlessly integrate native code into your Flutter projects, providing a richer and more robust user experience. So go ahead, explore the native side of Flutter, and take your mobile app development to the next level!
FAQs
1. Why would I need to call native code in my Flutter app?
Calling native code allows you to access device-specific features and improve performance in your Flutter app. It’s essential for tasks like integrating with hardware components or using platform-specific APIs.
2. What are the main benefits of using Platform Channels in Flutter?
Platform Channels provide a seamless communication bridge between your Flutter code and native code, enabling you to call native functions from Flutter and vice versa. This enhances your app’s capabilities and flexibility.
3. Do I need to be an expert in both Dart/Flutter and the native platform’s language to call native code?
While expertise in both languages is beneficial, you can work with collaborators who are proficient in the native language if you have a strong understanding of Dart and Flutter.
4. Can I call native code in both Android and iOS using the same Flutter project?
Yes, you can call native code in both Android and iOS using a single Flutter project. You’ll need to write platform-specific code for each platform, as demonstrated in this article.
5. Are there any performance considerations when calling native code in Flutter?
Performance considerations depend on the complexity of the native code and how efficiently it’s integrated. Proper optimization and testing are crucial to ensure smooth performance in your app.