Flutter with Provider State management

In this blog we’ll take a look at the provider approach in Flutter. The provider pattern is far easier to learn and has much less boilerplate code as compared to BLoC pattern.
In this post, i’ll take demo of todo app and use the provider pattern on it. In this demo we can add todo task and later device them in three section like i)All todo list, ii)Completed todo list iii) In-Completed todo list.
You can get source code from Github.
I have also post blog on State Management in Flutter with GetX previously.
Benefits of Provider
The provider pattern in Flutter will look for the latest value provided. The diagram below will help you better understand.
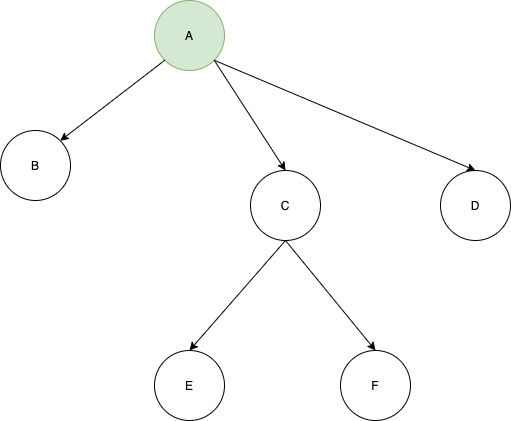
In this diagram the GREEN object A will be available to the rest of the elements below it, that is B, C, D, E, and F.
Getting Started
Create a new Flutter project and name it whatever you want.
Now add the provider dependency for the provider pattern in the pubspec.yaml file.
dependencies:
  flutter:
    sdk: flutter
  provider: latest_version
I have considered following architecture

Models
Below is the code to create Todo Model class
class Todo{
  String title;
  bool completed;

  Todo({ this.completed = false, @required this.title});

  void toggleCompleted() {
    completed = !completed;
  }

}
Provider
I have created todo_notifier.dart file in which i have added business logic for todo app
class TodoNotifier with ChangeNotifier{
  List<Todo> _todos = [
    Todo(title: 'Todo One'),
    Todo(title: 'Todo Two'),
    Todo(title: 'Todo Three'),
    Todo(title: 'Todo four'),
  ];

  UnmodifiableListView<Todo> get allTodos => UnmodifiableListView(_todos);

  UnmodifiableListView<Todo> get inCompleteTodos => UnmodifiableListView(_todos.where((Todo todo) {
    return todo.completed == false;
  }));

  UnmodifiableListView<Todo> get completeTodos => UnmodifiableListView(_todos.where((Todo todo) {
    return todo.completed == true;
  }));

  void addTodo(Todo todo) {
    _todos.add(todo);
    notifyListeners();
  }

  void deleteTodo(Todo todo) {
    _todos.remove(todo);
    notifyListeners();
  }

  void toggleTodo(Todo todo) {
    final todoIndex = _todos.indexOf(todo);

    _todos[todoIndex].toggleCompleted();
    notifyListeners();
  }

}
Pages
Now we will make dependency injection to UI screen with help of ChangeNotifierProvider widget. Below is the code in main.dart file for dependency injection of TodoNotifier in main
void main() => runApp(MyApp());

class MyApp extends StatelessWidget {
  // This widget is the root of your application.
  @override
  Widget build(BuildContext context) {
    return ChangeNotifierProvider(
      builder: (context) => TodoNotifier(),
      child: MaterialApp(
        title: 'Flutter Todo',
        theme: ThemeData(primarySwatch: Colors.blue, brightness: Brightness.light),
        home: MyHomePage(
          title: 'Todo App',
        ),
      ),
    );
  }
}

class MyHomePage extends StatefulWidget {
  MyHomePage({Key key, this.title}) : super(key: key);

  final String title;

  @override
  _MyHomePageState createState() => _MyHomePageState();
}

class _MyHomePageState extends State<MyHomePage> {
  @override
  Widget build(BuildContext context) {
    return DefaultTabController(
      length: 3,
      child: Scaffold(
          appBar: AppBar(
            actions: <Widget>[
              IconButton(
                onPressed: () {
                  Navigator.push(context,
                      MaterialPageRoute(builder: (context) => AddTodoPage()));
                },
                icon: Icon(Icons.add),
              ),
            ],
            bottom: TabBar(
              tabs: [
                Tab(
                  text: 'All',
                ),
                Tab(
                  text: 'Complete',
                ),
                Tab(
                  text: 'In Complete',
                ),
              ],
            ),
            title: Text(widget.title),
          ),
          body: TabBarView(
            children: [
              AllTodos(),
              CompleteTodos(),
              InCompleteTodos(),
            ],
          )
          // This trailing comma makes auto-formatting nicer for build methods.
          ),
    );
  }
}
the file add_todo_page.dart is created for adding new task in todo list. In below example we access notifier with Provider.of<TodoNotifier> passing argument current context and listen: false , listen false as a result we do not need to update current button for adding task.
import 'package:flutter/material.dart';
import 'package:provider/provider.dart';
import 'package:todos/models/todo_model.dart';
import 'package:todos/providers/todos_notifier.dart';

class AddTodoPage extends StatefulWidget {
  @override
  _AddTodoPageState createState() => _AddTodoPageState();
}

class _AddTodoPageState extends State<AddTodoPage> {
  final todoTextController = TextEditingController();
  bool completeStatus = false;

  @override
  void dispose() {
    todoTextController.dispose();
    super.dispose();
  }

  @override
  Widget build(BuildContext context) {
    return Scaffold(
      appBar: AppBar(
        title: Text("Add new Todo"),
      ),
      body: ListView(
        children: <Widget>[
          Padding(
            padding: EdgeInsets.all(16),
            child: Column(
              children: <Widget>[
                TextField(
                  controller: todoTextController,
                  decoration: InputDecoration(
                    border: OutlineInputBorder(),
                    hintText: 'Todo title',
                  ),
                ),
                CheckboxListTile(
                  value: completeStatus,
                  onChanged: (bool checked) {
                    setState(() {
                      completeStatus = checked;
                    });
                  },
                  title: Text('Complete?'),
                ),
                ElevatedButton(
                  onPressed: onAdd,
                  child: Text("Add"),
                ),
              ],
            ),
          )
        ],
      ),
    );
  }

  void onAdd() {
    final String todoTitle = todoTextController.text;
    final bool complete = completeStatus;

    if(todoTitle.isNotEmpty){
      final Todo todo = Todo(title: todoTitle, completed: complete);
      Provider.of<TodoNotifier>(context,listen: false).addTodo(todo);
    }
    Navigator.pop(context);
  }
}
Now we display all task in list for that i have created all_todos_page.dart in which all task has been listed weather it is compete or In-complete.
class AllTodos extends StatelessWidget {
  @override
  Widget build(BuildContext context) {
    final allTodos = Provider.of<TodoNotifier>(context).allTodos;
    return Container(
      child: TodoListView(todos: allTodos,),
    );
  }
}
Accordingly the completed task list in complite_todos_page.dart
class CompleteTodos extends StatelessWidget {
  @override
  Widget build(BuildContext context) {
    final List<Todo> completeTodos = Provider.of<TodoNotifier>(context).completeTodos;

    return Container(
        child: TodoListView(
          todos: completeTodos,
        )
    );
  }
}
Moreover the In-completed task list in incompelet_todos_page.dart
class InCompleteTodos extends StatelessWidget {
  @override
  Widget build(BuildContext context) {
    final List<Todo> inCompleteTodos = Provider.of<TodoNotifier>(context).inCompleteTodos;

    return Container(
      child: TodoListView(
        todos: inCompleteTodos,
      )
    );
  }
}
Now the common TodoListView used in all three list in todo_list_view.dart
class TodoListView extends StatelessWidget {
  final List<Todo> todos;

  const TodoListView({Key key, this.todos}) : super(key: key);

  @override
  Widget build(BuildContext context) {
    return Container(
      child: ListView.builder(
        itemBuilder: (BuildContext context, int index) => ListTile(
          title: Text(todos[index].title),
          leading: Checkbox(
              value: todos[index].completed,
              onChanged: (bool checked) {
                Provider.of<TodoNotifier>(context,listen: false).toggleTodo(todos[index]);
              }),
          trailing: IconButton(
              icon: Icon(
                Icons.delete,
                color: Colors.red,
              ),
              onPressed: () {
                Provider.of<TodoNotifier>(context,listen: false).deleteTodo(todos[index]);
              }),
        ),
        itemCount: todos.length,
      ),
    );
  }
}
In above code you can notice that we access notifier with Provider.of<TodoNotifier> to toggle and delete item from the list and in this way we can manage state in app with help of Provider.
Afterwards when you run app you can see once added a task can be able to access in all widgets and can also be manipulated from any widget.

Hope you like the concept of provider in flutter. As compared to other other state management approach this is quire easy to implement.